Room decorating and designing can sometimes be scary with all of the choices that are available. Homeowners may feel afraid to decorate their home according to their own decorating style, because they are afraid that it will not look good. This then leads them to leave the room unfinished, which makes the room feel unappealing and boring. Adding special touches of décor in a room may be just the thing that a room needs to make it feel more complete, so that it will become a warm and inviting room to you and your family and friends.
Some special touches that you may want to consider for your room are ceiling medallions, ceiling domes, corbels, and molding. Each of these items can be easily installed and they can help add some detailing to your room to make it more visually interesting. Adding just one of these pieces can give your room that special touch that it needs to make it feel and look more complete and together. Where can you add these special touches?
- The ceiling. The ceiling is an often overlooked surface in homes. Adding ceiling domes or ceiling medallions in conjunction with your lighting fixtures or alone can add detail to your ceiling that is unmatched.
- The walls. Walls can seem to go on and on when you are trying to decorate. By adding touches of molding to transition to the ceiling, you can make the walls more visually interesting. Chair railing is also a great way to add a special touch to your walls. Breaking up the walls with chair railings will make them more appealing to look at.
Corbels and rosettes can make any wall look better. These decorative accents will give you decor that is unmatched by anything else. This could be the special touch that your room needs to help make it more appealing to you and your family and friends. They come in a variety of styles and sizes to enable you to find the right one for your room and for your particular decorating style.
Special touches can make any room feel warmer and more comfortable for you and your friends. By finishing your room, you will be able to relax and enjoy the room much more than you would if the room were left unfinished. The special touches may not seem like they make much impact, but the details are where the heart is-in your home and in your decorating.
Visit GoCeilingMedallion.com now to find these and many other decorative ceiling accents in a variety of styles and designs. Don't spend a fortune beautifying your home, just look like you did.
Sunday, August 26, 2007
Wednesday, July 11, 2007
How to Use Tuscan Style To Decorate Your Home
If you are having difficulty making a decision about a home decorating theme, Tuscan style is a great home decorating idea. Many homeowners are attracted to the Tuscan style because it combines subtle elegance with simplicity. Using a palette of earthly tones, Tuscan style, which is an Italian country design, is meant to bring the outdoors inside. This great home decorating idea uses distinct materials to help accomplish this goal. Tuscan style is unique as well as beautiful.
When deciding to use a Tuscan theme to decorate your home, you’ll be using textures. This home decorating idea implements the use of various textures, such as stone and tile for the flooring. This helps to create a natural atmosphere. Plaster is suggested for the walls to add texture, providing an opportunity for you to be creative and have fun. Tables are often made of stone. Tile mosaics are another recommendation for tables in Tuscan home decorating.
Any home decorating theme that focuses on nature uses wood. Tuscan style makes great used of wood. One example of this is the exposed framework constructed from large wooden beams. This great home decorating idea uses wood in furniture as well. The goal is to make it look aged in appearance. This can be accomplished using staining techniques. Of course if you want furniture which looks really old, antique furniture would be the ideal choice.
Tuscan decorating is based on a cultural heritage. By using accessories, this Tuscan heritage can be brought out. Accessories that are homemade are common for this home decorating idea. Ceramics are frequently used in Tuscan decorating. Silver frames, silver candlesticks, copper pots are all common to Tuscan design. Wine and wine glasses are also popular accessories for this great home decorating idea. Large glass jars filled with olives is another great idea for Tuscan decorating. Terra cotta is a popular color when using the Tuscan theme so it might be nice to use terra cotta pots or vases.
Tuscan fabric is in a class of its own. When using this home decorating idea, you will be looking for fabrics made of burlap, abaca fiber, fibers from the banana tree, savannah cloth and tobacco cloth. These are all fabrics used to create a natural space. These materials are quite versatile and can be used for just about anything in your decorating project. Curtains, drapes, blinds, dividers, screens, placemats, and floor-mats can all be created from the various Tuscan fabrics because of their weight, density and flexibility.
This great home decorating idea makes use good use of colors such as yellow and red. These colors are probably used in tassels or painted beads in tie-backs to accent the drapes. Using yellow and red ribbon to decorate accessories like candlesticks or jugs is common in Tuscan decorating. Any material or accessory which resembles the sea, the earth or the forest make great additions to Tuscan style home decorating. This great home decorating idea found in Tuscan style is a good choice for your space. The color, texture, fabric and accessories will create a warm and inviting feeling in any space in your home. This theme of simplicity and nature is a great home decorating idea.
For more great home decorating ideas, or to find accessories to accent your Tuscan theme, visit GoCeilingMedallion. We are your GO TO people for all of your home decorating ideas. Let us help you turn your dream home into a reality.
Tuesday, June 05, 2007
Two More Moldings You Can Use to Frame Any Room
We've talked about so many types of moldings and ways that they can be used to frame and decorate any room. With molding, you can create so many different looks for your home, you are truly limited only by your imagination.
I want to briefly talk to you about two more types of molding that you can use to accent your home.
Frieze molding has been used throughout the ages in a variety of styles. The frieze is a flat molding, frequently decorated with relief carving or classical profile. Frieze molding is usually found under the crown molding or cornice.
Picture rails and friezes are often confused, while in actuality they are two separate entities, although the difference is slight. A picture rail has a rounded top edge protruding out from the wall, where hooks are often placed. Its main purpose is for hanging pictures.
The picture rail or frieze and the chair rail form what is known in the Victorian architectural style as a tripartite. The wall is effectively broken up into three separate areas. This type of wall treatment extends your options for decorating considerably.
Panel molding is used to break large surfaces up into panels. Panel molding is normally found on doors, but can also be used to decorate walls and ceilings. Fairly easy to install for the average do-it-yourself homeowner, panel molding can be used to create a custom look. Panels can be used in creative ways utilizing such features as size, curves, and decorative corners. Little details may be slipped inside to create an even more elegant look.
Use polyurethane moldings to easily create elaborate panel designs. Mix and match panel moldings with frieze moldings or chair railings. Some can also be used alone as small chair rails or you can use them to create wall or ceiling panels. More elaborate designs can be used by combining corners. There is no limit to what you can do with these versatile accents.
Visit GoCeilingMedallion now. We offer 100's of products for designing your rooms your way.
Monday, May 28, 2007
Measurement Legend Definitions
We get a lot of questions from customers asking us how to measure for their products. Here's a quick guide to measurements that we have found useful.
Center Diameter: Center area diameter measurement.
Depth: Projection measurement / how far "out" a product projects from the ceiling or the wall.
Fascia: Measurement of the exposed molding face.
Height: Vertical measurement.
Inner Diameter: The inner circle measurement of a decorative rim.
Length: Linear length measurement.
Outer Diameter: The outer edge measurement of a circular product.
Projection: The measurement product projects from wall or ceiling.
Repeat: The measurement of the decorative pattern on molding, from the beginning of the pattern to the start of the next pattern.
Width: Horizontal Measurement
Hope this helps!
Visit GoCeilingMedallion for all of your decorative needs. We are your GO TO people for all of your decorative needs and questions.
Saturday, May 19, 2007
Framing Your Room With Moldings
Decorating your home can be a very overwhelming undertaking, due to the large number of details. Many times, homeowners just plain run out of ideas or steam when decorating their home and this can leave their rooms looking unfinished and incomplete. There are some simple ways that you can help to make your room look more finished and one of the most common ways is to add moldings around the ceilings or along the walls. Moldings frame the walls and the ceiling to help enhance the décor and to help make your entire decorating scheme look more cohesive and complete.
Molding comes in a wide variety of widths and designs, so you should have no difficulty finding one that has the look and feel you want to enhance your room. From a 2-inch molding to a molding that is 8-inches or more, there are a great deal of choices in how wide you want the molding to be. The wider the molding, the more noticeable it will be and the larger the statement that it will make. From detailed to simply designed molding, there are many rooms in your home where it will enhance the look and feel of your home.
Detailed crown molding with rosettes, roman designs, and geometric designs look best in rooms that are more sophisticated and formal, such as a formal living room or dining room. Plain and more simply designed molding looks best in rooms that are more casual in nature, including a country kitchen, a family room, or a bedroom. Whatever decorating style that your home is, you should have no problem finding a molding that helps to enhance that decorating style.
Molding can be easily installed by any do-it-yourselfer or you can hire someone to install it if you are not very handy. Mitered cuts will need to be made to fit the pieces together, so with a miter saw and a tape measure, you can make the cuts that you need. Be sure that you snap a straight line on your wall so that you can make sure that you install the molding straight. Some walls and ceilings are not necessarily plumb. For more detailed installation instructions see How to Painlessly Install Crown Molding.
Crown molding is the way that you transition the eye from the walls to the ceiling. This molding should be chosen based on the style of your room and your own personal desires. Chair molding is used as a decorative accent in the middle of a wall. Many times, homeowners paint the walls two different colors and the chair rail works to separate the colors.
Whatever the molding that you choose, it definitely can help to make your room look finished, as well as beautifying your decor. You are sure to find a molding that helps to enhance your room, your decorating style, and your personality.
For a wide variety of molding choices, see GoCeilingMedallion. We are your GO TO people for all of your decorative ceiling needs.
Tuesday, April 17, 2007
Use a Classic Wall Niche to Showcase Your Art and Photographs

Do you have some elegant statuary or beautiful art objects that you would like to display in a tasteful and artistic way in your home? Do you have photographs that you would like to show off in an architecturally classic way? If you answered yes to these questions, have you considered a decorative wall niche as the perfect approach to doing so?
 Wall niches create an instant architectural focus for a timeless look of beauty and charm. Use niches to adorn your foyer, hallways, living rooms or any room that you want to decorate and showcase your precious mementoes.
 Just to give you a little background on the history of the niche, in classic architecture, the niche is an exedra or apse that has been greatly diminished in size. The niche usually maintains the half dome heading which is characteristic of the apse. An exedra is a semicircular cavity set into the façade of a building. It is frequently crowned with a half-dome. These recessed areas were usually equipped with a ring of stone benches and its main purpose was as a spot to engage in esoteric and philosophical discussion.
The apse is probably recognized as the semi-circular section of the sanctuary of a church, usually situated at the east end beyond the altar.
The niche is basically a Gothic architectural feature that is frequently found in religious and university settings. They are often found throughout a church filled with statues. Look around church the next time and notice how many niches may be utilized, especially around the altar.
Gothic architecture is a style that is particularly associated with cathedrals as well. This architecture thrived in Europe during the high and late medieval period. In France, it became known as the “French Style” during the 12th century. The term Gothic itself became a sort of insult during the Reformation era. During the 15th century, it was succeeded by Renaissance style architecture. Then began the Gothic revival styles around the mid-18th century in England, spreading through Europe in the 19th century and on into the 20th century in, as mentioned above, largely ecclesiastical and university structures.
Wall niches were common fixtures in older homes built decades ago. They served a functional purpose in that they frequently held the home’s telephone. Even though they are no longer necessary, people still appreciate the classic look of the wall niche. Rich in detail and long on beauty, these decorative wall accents add special expression to any décor.
While niches used to be constructed of heavy plaster molding and woodwork, today they are made of a lightweight urethane, making them much easier to install. In addition, they come as one piece units. Paint your wall niche in a slightly contrasting color to your wall and you have added a tasteful focal point for your favorite art object.
While recessed wall niches require framing and some minor do-it-yourself handyman skills, you may also order surface mounted niches. Surface mounted niches do not require a hole in the wall or any special skills. Just attach it to the wall with screws. Then caulk it and paint it and voila, you have just added a unique and classically beautiful accent that anyone would be proud to show off.
Visit GoCeilingMedallion today and pick out just the perfect niche for your home.
Sunday, April 08, 2007
Do You Have Questions About Our Products?
Our goal at Goceilingmedallion is to provide you with the best selection of high quality decorative ceiling products so that you can create the perfect ceiling for the room you want to live in.
We only sell products from reputable manufacturers at the high end of the quality range. Our manufacturers are dedicated to providing only quality product. We are all dedicated to excellence and to our customers.
To that end, I wanted to take a few moments to address some of our customer’s most frequent product questions.
What are the benefits of using polyurethane molding and decorative accents over other materials such as wood, plaster or gypsum?
Polyurethane products are engineered and manufactured to fit well against your walls and ceilings easily. Polyurethane products eliminate splintering, cracking, warping, rotting and finish sanding that are more common with wood products.
Plaster and gypsum products are heavy, creating problems with shipping and installation. Our polyurethane products are water and heat resistant, impervious to insects, and will not rot, crack, shrink, splinter, or warp.
Can I paint or finish my polyurethane product?
All of our products can be painted with any high quality latex or oil based paint. You can add a gold, silver or copper leaf finish for a more majestic appearance. Faux finish your ceiling medallion or crown molding in a marble, granite or gemstone surface. Experiment with one of the newer decorative finishes, like suede, leather, sponging or stippling.
Lacquer based paints or finishes are not recommended, however. Otherwise, the decorative possibilities are limitless.
Are polyurethane products as easy to maintain when placed outdoors?
Definitely! All products from our manufacturers are factory-primed and essentially maintenance free. Our products take nails without splitting, saw like wood; they are lightweight and durable. Polyurethane resists water, heat and insect infestation.
Is it beneficial to use fiberglass products?
Fiberglass products have been used for automobile and boating manufacture because of their resistant qualities. Fiberglass also has characteristics which allow for large product construction. Our manufacturers carry ceiling domes and niches made of fiberglass with these same impact resistant properties while retaining the beauty and elegance of handcrafted ceiling products. Domes and wall niches manufactured from fiberglass can be molded into one single piece. Each of our products is factory-primed and ready for your finishing ideas.
Are polyurethane and fiberglass architectural accents easy to install?
Complete and illustrated instructions for installation are provided with each of our products. Some are more difficult to install, such as our ceiling domes and wall niches, and may require good carpentry skills. Overall, polyurethane and fiberglass products are easier to install than wood, plaster and gypsum products due to their weight and size, as well as dimensional stability, precise tolerances and flexibility.
Do your products meet all applicable building codes?
Our products have undergone rigorous testing and meet or exceed all industry standards. All regional building codes and requirements should be reviewed prior to installation.
What is your return Policy?
I would like to take just a moment to address another issue: that of returned products. We will happily refund your order amount, less shipping, for any reason, no questions asked, provided you follow the proper procedure as outlined on our site at : http://goceilingmedallion.com/FAQ.html
Do not return the product!!! Returning items without authorization may cause them to not be properly credited to your account.
If you are not completely satisfied with a product, contact us within 5 days to arrange for a refund or exchange. We will issue you a RMA number to return the merchandise. For your protection, returned merchandise must be insured for the value of the merchandise. Repack items carefully in the original packing material and prepay and insure the shipping. (Please note you are responsible for the safe return of the merchandise and all shipping costs.) No refunds will be made on any merchandise that has been used or altered in any way.
I don’t mean to sound like I’m lecturing, but that is why we ask our customers to become familiar with our policies. We want to provide excellent customer service, but we do require your patience and understanding if we ask for your help.
We offer a large catalog of polyurethane and fiberglass ceiling medallions, crown molding, and accents of only the finest quality from only the most reputable manufacturers. Please visit our website at GoCeilingMedallion today to see our latest additions and specials. As always, we welcome your ideas for improving our website.
Tuesday, March 27, 2007
How to Use Flexible Molding


Have you ever wanted to put crown molding around an arched doorway or a curved wall in one of your rooms, but couldn’t find anything to use, so you gave up? Well, you might have given up too early. Flexible molding was designed for just such projects. Flexible molding makes it a cinch to decorate around curved walls and arched doorways and windows.
Flexible molding is made from a compound polymer resin that has been engineered to bend or curve around more challenging shapes. It can be bent or twisted without breaking or splintering. Flexible molding can actually be purchased in a range of grades, from very flexible to totally rigid.
You can find flexible molding in just about any design and type you can imagine. Chair rails, baseboards, cornice, window casements, and crown, are all available for your decorative needs. Keep in mind, though, that you really only want to use flexible molding where it is essential to your home improvement project, as it does cost much more than wood millwork.
One of the best features of flexible molding is it's superiority to wood. Flexible molding can be stained, painted, or sealed just as ordinary molding, but without having to prime the surface first. It also resists warping, wearing, splitting, or mildewing, so it's great for outdoor use as well.
Flexible molding conforms to any radius and it is easily installed. The cost of labor is kept down by eliminating standard procedures, such as steaming or cut-n-fill, that would usually be required when decorating rounded walls and columns.
Another great advantage of flexible millwork products is that they look just like real wood. They can be painted, cut, sawed, drilled or shaped just like real wood products. You can use flexible molding on any radius or curved treatment where wood can not be used.
Advantages of Flexible Molding
The advantages and uses for flexible molding are numerous and allow the homeowner to modernize their home in new and original design conceptions. Here is a brief recap of the advantages of flexible molding:
• It looks like real wood.
• It is durable so it can also be used exteriorly
• It’s flexibility is a major advantage
• It resists moisture
• It is insect resistant
• It can be finished like wood
• It can be painted like wood
• It can be found in a variety of designs
• It can be routed, cut, sawed or shaped like wood
• Flexible molding is not affected by heat, cold, moisture or salt
• It can be painted, sanded, or stained
• It can be drilled, nailed, or glued
• It is easily installed
GoCeilingMedallion.com offers several brands of flexible molding from our manufacturers. These moldings offer an incredible labor savings when your decorative molding installations necessitate a curved or arched product. They can be custom ordered from a wide collection of crown, cornice, chair rail, frieze, and panel moldings.
Most moldings can be ordered in incremental lengths from 4 feet to 12 feet and you can order any combination of these lengths for your application.
Some general recommendations for both types of flexible molding address surface preparation and pre-installation groundwork.
Before Installation:
• You may choose to finish (paint or faux finish) the molding before installation
• You should place the molding in the room for 48 to 72 hours before installing in order to allow the molding to adjust to the temperature and humidity levels of the room
• ALWAYS store molding in a dry, well-ventilated, low-humidity area
• NEVER store your molding outdoors.
Surface Preparation:
• Clean all surfaces free of dirt and loose particles with a clean cloth or sponge
• Make sure the area is completely dry before installing.
The photos above give you some idea of the flexibility and advantages of flexible molding. Anywhere you can imagine using flexible molding or any style that you desire are possible to afford you the capability to design the home of your dreams. Give GoCeilingMedallion.com a call with your custom order today.
Thursday, February 22, 2007
How to Painlessly Install Crown Molding
Crown molding, or cornice, is probably the most important architectural accent used to detail any interior space. Most interior designers today would agree that every room can be improved with the use of crown molding. Crown molding smoothes the transition from the wall to the ceiling and does a wonderful job of defining the architectural style of a room. Crown molding is also used to finish cabinets, built-ins, and fireplaces.
Crown molding will enhance the look of any room and is not that difficult to install. Installing larger, more complex moldings will require a little extra care to match the pattern at joints and corners. You can also build up larger crown moldings by using a number of smaller moldings. Used this way, custom crown molding profiles can be created to suit your tastes. Built up crown molding can also be used to help hide some of the variations in the ceiling and walls.
Follow these simple and easy to understand instructions to enhance the look and feel of any room in your home. Remember, safety is so important when attempting any project. Always follow approved safety practices. Use hearing and eye protection. When you need to use a dust mask or respirator, be sure to use the right one for the job.
Planning
Planning is probably the most commonly neglected part of any job. This is too bad because proper planning is what makes the difference between a quick and efficient installation or massive frustration and numerous interruptions to run to the hardware store. Planning is especially important when installing crown molding.
If your decorative project will include several types of molding, it is recommended that you choose the style and size of crown molding first, as it is the most prominently displayed. Then select the rest of the moldings to match.
Regarding the proper sizing of the crown molding, advice is abundant and many guidelines have been written. Most often the advice directs you to select the size of the crown molding based on the height of your ceiling. However, larger crown moldings have often been used to impressively decorate rooms of more modest proportions. What IS important is to properly scale the casings and other moldings to the size of the crown molding that you wish to use. When choosing crown molding for your interior, feel free to select the size and style that YOU like.
After you have decided on a size and a pattern of crown molding to use, your next step is to determine how much crown molding to purchase. You will need to allow for cutting waste at each joint. One way to do this is to simply measure the perimeter of the room and add a waste factor (usually 10%). The problem with this, however, is that it's not really accurate and it doesn't take into account one very important factor, namely, repeating patterns.
What I like to use is a cut list showing each piece of crown molding for the entire room. This lets me optimize my use of the stock lengths. I also use this information to allow for cutting waste from corners and for pattern repeat. A cut list is also useful to eliminate unnecessary joints by planning all of the joints before ordering the material. Some crown molding is available in more than one length. This can help to eliminate joints and waste. This is also the time to calculate how much adhesive and how many fasteners you will need.
Order Materials
Now that you have completed your planning it's time to order your crown molding. Order your adhesive, fasteners, caulk and any other tools or supplies you might need. Order everything at the same time and save yourself extra trips to the store.
Assemble Materials
Set up a work area as close as possible to the room you are working in and assemble all of your materials. Now is a good time to make sure that you have everything that you will need. If something is missing, stop and go get it now, before you start. Check over the crown molding one last time to ensure that it has not been damaged on the job. If your crown molding has been stored at a temperature significantly different from the room’s normal temperature, then allow 24 hours for the temperatures to equalize (72 hours if you are using wood).
Pre-finishing
If the finish you are going to use is more involved than a coat of flat white paint, you might want to pre-finish your crown molding before installation and then touch it up after it is installed. This is also a good idea if there is any danger of damaging the existing walls during the finishing process.
Layout
Draw a solid line all the way around the room showing the bottom edge of the crown molding. The distance from the ceiling to this line is the height of the crown molding. All ceilings have some unevenness along the joint of the ceiling and the wall. The joint where the crown molding meets the wall is normally more noticeable than the joint at the ceiling, so try to keep this line as straight as possible. Make a second line on the ceiling to mark the projection of the crown molding onto it. Now mark the wall studs and the ceiling joists. Make sure that all of your marks will be visible with the crown molding in place.
Start Installing
Decide which inside corner is going to be the least noticeable in the finished room. This is where you want to start since it is not always possible to get a good match on the pattern with the last piece. Wood moldings are normally coped at inside corners and lapped at straight joints. DO NOT COPE OR LAP POLYURETHANE MOLDINGS.
When installing polyurethane crown molding, miter cut both the inside and the outside corners. Use straight butt joints to join polyurethane molding. Double check the lengths and use your cut list to make sure that you cut the moldings the same way as planned. Otherwise you might run out of material or be forced to make an extra joint.
What you need to remember when cutting crown molding is that it is turned upside down on the saw or miter box. To ensure a tight inside corner, cut the molding a little long and spring it into place (add 1/8 to 1/4 inch for polyurethane or 1/16 inch for wood). Before you apply any adhesive, you should dry fit each piece of crown molding to be sure of a proper fit. If necessary, you can trim any extra with a razor knife, rasp, block plane or sandpaper. Once you are satisfied with the fit, attach the crown molding using coated trim screws or finish nail. Install fasteners into studs where possible.
Polyurethane crown molding with a face measurement over 8 inches will require a 1/4 inch bead of adhesive at the top and bottom in addition to mechanical fasteners. Although it is not required, we recommend the use of adhesive with all polyurethane molding installations. Adhesive is also required at all joints.
Finish up
After the adhesive has dried for 24 hours; fill in all the holes made from the fasteners, caulk the top and the bottom, and then either touch it up or paint it.
Last step: show it off!! Have fun with your project.
Copyright 2007 goceilingmedallion.com
GoCeilingMedallion.com has the best selection of high quality ceiling products, featuring a full line of over 100 patterns of crown molding and 18K Gold leaf crown moldings. If we don't have it, we'll find it for you. We are your GO TO people for all your decorative ceiling needs.
Saturday, February 17, 2007
The International Builders' Show: Youv'e Got To See It To Believe It!


Let me start this blog off by apologizing for my lack of posts over the past 2-3 weeks. It has been a very busy time for us here at GoCeilingMedallion.com.
I plan on getting back in the swing of it over the next couple of weeks. We have a lot of changes going on right now and we think you will really appreciate many of them.
One of the things that has kept us busy was the International Builder's Show (IBS). What an unbelievable assembly of some of the world's latest talent and technology to hit the home builder and design world. This was actually my first trip to the Show. The Show was held from February 7-10 at the Orange County Convention Center in Orlando, Florida. I was amazed at the sheer size of it first of all. More than 1 million square feet were devoted to the most innovative products and services.
The 2006 President of the National Association of Home Builders (NAHB), David L. Pressly, Jr. said, "...the IBS is the world's premier showcase of products and services for the home building industry." The exhibit included products from over 1800 cutting edge developers and builders, with about 450 new exhibitors this year. This was the biggest turnout the NAHB has seen to date.
Although Bob and I did not get the opportunity to attend any this year, the IBS is also well-known for it's educational seminars and workshops. These programs included topics such as marketing, finance and business practices, as well as sales and the economy. There were more than 290 different seminars available to anyone looking to stay abreast of all the latest in this competitive market.
We took advantage of the networking aspect, meeting our suppliers and manufacturers. Bob and I were also busy searching out a variety of new products to offer our customers. Stay tuned over the next few months because we are going to be offering a whole new assortment of products to you at the best and lowest prices. You may also see a total remake of the website in the future.
I included some photos from the IBS. There's the entrance at the top. That's Bob in the second photo and the third photo with a new product. The last photo is a shot of everybody moving between buildings. We had a great time!
Look for photos of some of the products we'll be adding to GoCeilingMedallion.com in later posts. I also have photos from a trip to New Mexico. Wait until you see some of the architecture in Silver City.
Well, that's all from me for now. Let me know what you want to see. Don't forget to send photos of your finished rooms. I would love to post them on our blogs. Thanks again to all of our loyal and new customers.
Monday, January 15, 2007
How to Size a Ceiling Medallion Properly
One of the easiest and least time-consuming projects that anyone can undertake is the installation of a ceiling medallion. Although in the past they were made from plaster, today these decorative ornaments are made of lightweight polyurethane foam. This makes them much easier to handle. Ceiling medallions are used to draw attention to chandeliers and light fixtures, or to enhance crown molding. They are also used to create a special charm and ambiance reminiscent of an era where comfort, warmth and elegance flourished.
Our goal at GoCeilingMedallion.com is to provide you with the best selection of high quality decorative ceiling products, tools and supplies, along with ideas and assistance to help you create that special atmosphere unique to you. We want you to have the perfect ceiling for the rooms that you want to live in. To that end, our full catalog features over 150 ceiling medallion styles, including a new Elegant Series.
One question that we get asked quite often: What is the best way to size your ceiling medallion? We want to answer that question for all of our readers and customers with this blog post.
There are essentially three factors to keep in mind when you are choosing and sizing a ceiling medallion:
1. Size of the fixture. The ceiling medallion you choose should be one that is either larger or smaller than the diameter of the actual fixture, not the base of the fixture. However, when combining it with a ceiling fan, medallions are usually those with a smaller diameter. You can combine the ceiling medallion with a ceiling rim to further enhance a larger fixture, too.
2. Size of the room. You want to make sure that the medallion you choose is proportional to the room in which you plan to use it. In other words, if you will be placing it in a grand entryway, you will want to use a larger size, for the best effects. Use a smaller ceiling medallion in cozier rooms or in narrower spaces.
3. Height of the ceiling. If your ceilings are 8’ high, the ceiling medallion that looks best will be one that is smaller. Too large and it could overpower your room rather than enhance it. Use a larger medallion if your ceilings are at least 10’ or higher. Again, you can utilize a ceiling rim with your medallion to have the effect of a larger medallion.
If you still aren’t sure, try one or both of these methods to help you pick the right size. Cut out a paper or cardboard cutout of the ceiling medallion that you like and affix it to the ceiling to get a better idea of how your medallion will look with your fixtures. You can also try varying sizes and compare them.
If you want the mathematical formula: Take the length of your room and multiply that by the width of your room. Divide that number by 7 to get the diameter of the ceiling medallion. For example: You have a room that is 12’ x 12’. That’s 144 square feet. Divide by 7 and you get a diameter of 21” for your ceiling medallion.
One final consideration to keep in mind is the style of your room. You may wish to complement the room with your ceiling medallion, in which case you should look for something that matches the pattern or style of your molding.
Ceiling medallions can also be combined with a rosette and used to decorate an otherwise plain ceiling. You can use these architectural ornaments as wall decorations. Use several small ones in the hallway. Ceiling medallions are versatile and come in many styles and sizes. They can be painted to match any room. They are frequently manufactured from high-density furniture grade polyurethane. This makes them lightweight, durable and easy to use. They are less expensive than molded plaster or carved wood, yet indistinguishable from those products. Ceiling medallions are one of the most popular architectural details utilized to enhance your home.
When all is said and done, however, there are no hard and fast rules. It is your home and you cannot go wrong when you are comfortable and happy. Like the Australians say: No Rules, Just Right.
So get started today with a ceiling medallion from GoCeilingMedallion.com. If we don’t have it, we’ll find it because we are the GO TO people for all of your decorative ceiling products.
Copyright 2007. Patricia Tomaskovic
Monday, January 08, 2007
Polymer or Polyurethane? What’s the Difference?
We talk about our products being manufactured from polymers or fiberglass or polyurethanes. Builders, designers and manufacturers bandy these words about easily. But what exactly do these terms mean? What is the difference between a polymer and a polyurethane? Or between polyurethane and fiberglass?
I decided to do a little research on Wikipedia.com and Artlex.com to help distinguish the similarities and differences between the three terms for all of our readers and customers. This is what I have come up with.
A polymer is a chemical compound that is formed of large connecting molecules. These molecules, when arranged together, make up natural or synthetic (man-made) resins. Resins are sticky substances used to create paints, plastics and nylon. Polyurethane is one type of material made of polymers.
Polyurethanes, then are any of a variety of polymers which contain urethane. A urethane is a "crystalline compound that is used as a solvent and as the basis for polyurethanes" (Artlex.com). Urethane and polyurethane are used interchangeably to refer to the same type of substance. Polyurethanes are actually chains of organic polymers that are joined together by urethane links. These can vary in characteristics such as flexibility and rigidity.
Polyurethanes are found in many items. They are used in resins, adhesives, fibers, foam padding and insulation. They come in several forms, such as rods, sheets and liquids.
Polyurethanes are frequently used as an alternative to such materials as wood, plastics, metal and rubber. And for good reason. Polyurethanes are resistant to wear and tear, weather, impact, scratching and erosion. They are also more cost-effective as an alternative as well.
Other uses for poyurethanes, in addition to those mentioned above, include: fibers, seals, gaskets, condoms, hard plastic parts, carpet underlay and sealants. Items such as domed ceilings, moldings and ceiling medallions are easier to construct of polyurethane foam rather than wood.
In its most flexible form, polyurethanes are found in upholstery fabrics, while the more rigid foams are used inside the metal and plastic walls of most refrigerators and freezers. They are commonly utilized to make up paints, varnishes and glue. Your computer mouse-pad bottom is most likely made of polyurethane foam.
Variants are also used in tires, roller blades, skateboards, wheelchair tires, bicycle tires and auto parts like steering wheels and bumpers. Tennis grips, electronic parts, some surfboards and the foam used in chairs, couches and mattresses is of polyurethane foam. Polyurethane is also used in furniture, school tables, furniture found in hospitals and banks and shop counters and displays.
Wow!! Quite a versatile substance. It's low cost, lightweight and anything you can do to wood, you can do to polyurethane. Sounds like the greatest invention since sliced bread.
Finally, we come to fiberglass. Fiberglass is sometimes referred to as spun glass. It is also a light and durable product. Fiberglass is composed of a plastic resin fortified with glass fiber. These glass fibers are very minute and they are used to reinforce polymer products. Then we call them fiber-reinforced polymer or glass-reinforced plastic, both of which are commonly referred to as fiberglass.
Fiberglass is found in mats, insulation and fabrics that are heat resistant, corrosive resistant and high strength. Ceiling medallions, ceiling domes and moldings can also be constructed of fiberglass.
Fiberglass products are often as economical as polyurethanes. They are light weight and resist erosion, wear and tear and weather. They can be sanded, nailed, planed and painted, just as polyurethane products can be. Fiberglass products provide yet another alternative to more costly products as wood, ceramic or plaster, which are also more difficult to work with.
So there we have the nitty-gritty behind polymers, polyurethanes and fiberglass. I know I learned a bit more about each and I hope that you also found this to be an informative resource.
Visit GoCeilingMedallion.com to see the decorative ceiling products offered that are constructed of these amazing substances.
Sunday, December 31, 2006
HAPPY NEW YEAR!!

From Our Family to Yours: Thank You for A Wonderful Year and Looking Forward to Another Wonderful Year With All of Our Customers and to Meeting New People!
Bob and Pat Tomaskovic
GoCeilingMedallion.com
Sunday, December 24, 2006
MERRY CHRISTMAS!!

To All of our Families and our Friends, And to all our Customers and Readers
We here at GoCeilingMedallion.com want to wish you and Yours
Warmest Wishes and Merry Christmas!!
Monday, December 18, 2006
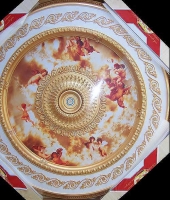
18K Gold Leaf Crown Molding
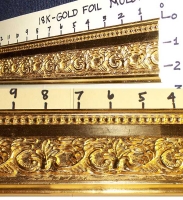
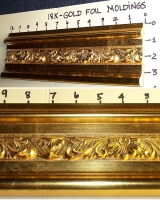
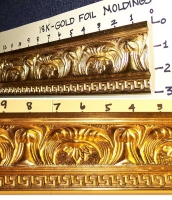
GoCeilingMedallion recently attained dealer status with RoJico Trading Company. RoJico is the exclusive impoter of an elegant new line of ceiling medallions offered by GoCeilingMedallion. We also have access to twenty unique designs of 18K Gold Leaf crown molding like that pictured above. Because we will be working directly with the manufacturer/importer, we can purchase a wide selection of high caliber products at reduced prices that we have passed on to our customer.
The crown moldings are manufactured from MDF and plaster, over which an 18K gold foil is applied. These crown moldings are installed just as any other type would be installed. They can be cut, sanded and nailed. They also come with a sheet of 18K gold foil for touching up.
Use these crown coldings to create dramatic and elegant effects in your home. Click here for more examples of our new line of 18K Gold Leaf crown molding and to place your order today.
Sunday, December 17, 2006
GoCeilingMedallion.com Registered Dealer of Rojico Trading Company Products
FOR IMMEDIATE RELEASE
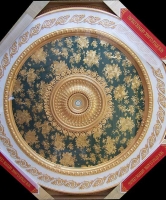
Mesquite, NV December 17, 2006--GoCeilingMedallion.com has recently attained status as a registered dealer with Rojico Trading Company, a direct manufacturer and importer of many quality decorative architectural products. Rojico is the exclusive importer of a unique line of ornate ceiling medallions now offered by GoCeilingMedallion.com.
Rojico ships from ports in both China and India. This gives them access to a wider collection of quality products. "We manufacture, import, and distribute a wide variety of product lines to the trade, which includes builders, architects, designers and many retailers. Rojico trade accounts have access to a wide range of wholesale products," stated Rojico Marketing Director, Jim Welch.
"The patronage of our customers has allowed us to slash prices and add products like the new Elegant Series ceiling medallions and 18K Gold Leaf crown moldings to our growing catalog at GoCeilingMedallion.com," affirms Bob Tomaskovic, Product Manager at GoCeilingMedallion.com.
"By working directly with the exclusive U.S. importer, we can purchase a wide selection of high caliber designer architectural items at reduced prices, which we can then pass on to our customers," Bob reports. He goes on to say that "we currently have access to about 150 ornate patterns of ceiling medallions in our Elegant Series and approximately twenty unique designs of 18K Gold Leaf crown molding."
The Elegant Series ceiling medallions are molded and assembled using a combination of modern polymers- molded pvc, vinyl, acrylic, and plastic materials, with a flat wood backing. This type of construction allows for the creation of a strong, yet lightweight product with vibrant colors, that resists warping and aging, and remains easy to care for.
What used to take a team of skilled artisans a week or more on site to create a ceiling feature as elaborate and detailed as our Elegant Series ceiling medallions, can now be achieved in a fraction of the time at significant savings in labor costs.
The crown moldings are manufactured from MDF and plaster, over which an 18K gold foil is applied. These can be cut, sanded or nailed. They are essentially installed as any other type of crown molding would be installed.
"We are very excited about our new dealer status with Rojico. The ceiling medallions are truly beautiful and so elegant. I love the gold leaf crown moldings, too. They are not for everyone, but if you have a flair for the luxurious, then these architectural details are definitely for you," comments Pat Tomaskovic, President of GoCeilingMedallion.com.
###
Patricia Tomaskovic is President and CEO of GoCeilingMedallion.com. For more information, you may contact us at: sales@goceilingmedallion.com.
Monday, December 11, 2006
Elegant Series Ceiling Medallions Added to Online Catalog at GoCeilingMedallion.com
GoCeilingMedallion.com is excited to offer a series of Elegant ceiling medallions that feature bold designs, vibrant colors and classic decorative themes. We are also able to offer Free Shipping on all Elegant series medallions.
It used to take a team of skilled artisans a week or more on-site to create a ceiling feature as elaborate and detailed as our Elegant Series ceiling medallions. Our Elegant Series allows you to achieve the same effect in a fraction of the time without the need to hire specialized artisans resulting in a significant savings in labor costs.
Elegant Series ceiling medallions are molded and assembled using a combination of modern polymers - molded pvc, vinyl, acrylic, and plastic materials, with a flat wood backing. This method of construction allows for the creation of a strong, light weight ceiling medallion with vibrant colors that is difficult to deform, resists warping and aging, and can be easily washed. Because they come fully assembled, they are very easy to install. Their relatively low profile (ranges from 2.5" to 4") makes them suitable for fairly low ceilings. They come in several shapes with dimensions from 37" up to 102" in size.
By working directly with the exclusive US importer we are able to offer our customers the best possible prices on these fantastic and elegant ceiling medallions.
GoCeilingMedallion.com is currently able to offer roughly 150 standard patterns of Elegant Series ceiling medallions and will be working to get them all into our online catalog as quickly as possible. For information on other available size/color combinations please Contact Us at sales@goceilingmedallion.com. We are always happy to help our customers find what they need.
Saturday, November 25, 2006
An Introduction to Decorative Molding
Decorative molding includes all of the kinds of trim used in a home. It can serve a purely decorative function, or it can also be used to hide any unfinished edges of a wall. Moldings can be made of wood-most usually of pine or oak-or, as is used frequently today, polyurethane. Polyurethane is a lightweight, long-lasting, durable alternative to wood. Molding can also be painted or stained.
This article provides a brief description of the types of decorative trim available as well as information available to guide you in your use of decorative molding in your home.
5 types of molding
There are five types of decorative molding commonly used. These include: baseboard, cornice, crown, wall moldings, and panel moldings. Let's take a look at each one separately.
Base. Base molding is the trim used to finish the wall along the floor. Also called a mopboard, the baseboard protects the wall. Ideally, your baseboard complements the casings around your doors and windows. A baseboard is commonly found throughout every room in most homes.
Cornice. The cornice is the decorative molding placed along the top of the wall. Cornice can be built up using many pieces of trim. Cornice is a more ornate version of crown molding. Ornamentation includes acanthus leaf, egg and dart, modillions, or dentil among many others.
Crown. Crown molding is also used along the top of the wall. Also called bed moldings, they are installed at an angle to adjunct surfaces. Crown molding is also used to finish cabinets, built-ins, and fireplaces. Cove molding, a rounded piece of trim at the juncture of the wall with the ceiling, provides yet another means of transition from the wall to the ceiling.
Both crown and cornice moldings have been around as long as the use of plastered ceilings has been. Cornice and crown moldings usually reflected the type or intended use of the room. For example, reception rooms were often decorated with more ornate cornice moldings, while plainer crown molding was often installed in the more functional areas of the home, such as the kitchen.
Wall moldings. This group includes the chair rails, and the less common picture rails and friezes. Chair rails are popular features and so can be found throughout many homes. It is the molding that sits approximately 30"-36" above the floor, right at about the height of a chairback. If you choose to panel the wall below, this trim is known as a dado cap.
Picture rails and friezes are often confused, while in actuality they are two separate entities, although the difference is slight. A picture rail has a rounded top edge protruding out from the wall, where hooks are often placed. Its main purpose is for hanging pictures. A frieze, on the other hand, is a flat molding, frequently decorated with relief carving or classical profile.
The picture rail or frieze and the chair rail form what is known in the Victorian architectural style as a tripartite. The wall is effectively broken up into three separate areas. This type of wall treatment extends your options for decorating considerably.
Panel molding. Panel molding is used to break large surfaces up into panels. Panel molding is normally found on doors, but can also be used to decorate walls and ceilings. Fairly easy to install for the average do-it-yourself homeowner, panel molding can be used to create a custom look. Panels can be used in creative ways utilizing such features as size, curves, and decorative corners. Little details may be slipped inside to create an even more elegant look.
Tips to Guide the Use of Decorative Moldings
Your use may be determined by a number of factors including the architectural style of your home, as well as your personal taste in design styles. Be sure that the size and scale of the trim is appropriate for the room to which you will be adding this type of ornamentation. If you choose to paint your moldings, keep in mind that contrasting colors can add a more "dynamic" element to your room. You may consider coordinating moldings with each other as well as with other design elements present in the room.
Synthetic polymer, or polyurethane, is a natural choice for molding today. As it is lightweight, it is easy to cut and install. Polymer is a more economically feasible choice if you opt for more elaborate decorative moldings. Moldings are also flexible, allowing the homeowner to trim curves and rounded areas of the home. When utilizing cornice and crown moldings, you can combine various types to create a more personal statement. However, this can be more challenging to install for the individual. Corner blocks are available as well in polymer. These can be useful in eliminating difficult corner cuts.
Now you are aware of many further options. Don't be intimidated. Installation instructions and informative articles like this one abound on the internet. Do your homework and investigate all of your available options. This is something that you will have to live with, so it should reflect your tastes. They will certainly set the decorative tone of any home. Good luck to you as you begin to use decorative moldings to create your wonderful space.
Visit GoCeilingMedallion for 100's of options to assist you in building the decorative home of your dreams.
Thursday, November 16, 2006
Show Us Yours..............Your Ceiling That Is
The American dictionary defines a ceiling as "the undersurface of the top of the room". However, I recently read a much better definition of a ceiling as being the "crowning glory of a room". I think many people look at ceilings as being merely functional: a great place to hide wiring and other mechanical systems. We spend a good deal of money remodeling our homes. We put in new bathrooms and new cabinets in our kitchens. We retile our floors. All of these things we do in the hopes of increasing the value of our homes. Some of these endeavors cost us a great deal of money.
So what can we do with our ceilings? It turns out there are many things we can do and for a lot less than some of the examples above. It's about time to put our ceilings on display. There are several types of ceilings that can be found throughout our homes, providing options during new construction or remodeling. There are also several further decorative options available should we choose to further adorn our ceilings. This article will focus specifically on the common types of ceilings .
Plain Flat Ceilings
The simple plain type of ceiling is usually constructed of flat plaster or Sheetrock. This type of ceiling is ideal for various decorative techniques, such as textured plaster and raised patterns. Decorative moldings and ceiling medallions can also be added. You can buy moldings and ceiling medallions plain and then paint them or you can purchase them custom painted.
Vaulted Ceilings
The vaulted ceiling is constructed on the principle of the arch. Vaulted ceilings are usually round, or barrel-shaped, and painted as would be found in a Gothic church. A groin vault where two barrels intersect perpendicularly is another type of vaulted ceiling. This type of ceiling was developed by the Romans but remains popular today.
Cathedral Ceilings
A cathedral ceiling is a pointed ceiling with two sloping sides. Cathedral ceilings open up the space in your home. They add grandeur to large spaces.
Ceiling Domes
Ceiling domes are bowl-shaped rounded ceilings. Rotundas, often seen in State Capital buildings, are ceiling domes of great magnitude. Domes can be flat and dish-shaped or they can be deep and high. Ceiling domes draw the eye upward creating an expansive feeling. Shallow recessed domes used in an entryway or dining area can create a space of great dignity and elegance.
Beamed Ceilings
Beamed ceilings expose rafters and trusses in a decorative way. Beamed ceilings can create a rustic feel to your home. You have the option of the simple, rough-hewn look or you can create rich carvings that you paint.
Coffered Ceilings
Coffered ceilings are boxes constructed in the recesses between the beams and cross-beams of your ceiling. In architecture, a coffer is a sunken panel in the shape of a square, rectangle, or octagon that serves as a decorative device . an example of this can be found in the ceiling of the rotunda dome in the roman pantheon (http://en.wikipedia.org/wiki/Coffer).
Coved Ceiling
Coved ceilings are formed with a curved radius or a straight angle where the wall meets the ceiling. The absence of sharp right angles softens the effect of each room where it is used.
This article covered the types of ceilings commonly found throughout homes built throughout the world. There are numerous other decorative ideas in addition, that will further enhance the beauty of any room. You can add dimension, depth and history. You can create an atmosphere that says this is who I am. We'll talk about other decorative ideas and features another time, so keep coming back. If you've done something really creative with the ceilings in your home, send me your pics. I'll post them here on my blog with your name. You are proud of your home. Now it's time to show it off! Send them to http://www.goceilingmedallion.com/Contact_Us.html.
Tuesday, October 10, 2006
More notable news
I know it's been a little while since I've posted. We've been working on the website. We have a whole new and fresher look. We think you will really find it a lot easier to navigate and find just what you're looking for. Look for further changes in the future. Keep telling us what you want to see on our website. We appreciate your feedback.
Subscribe to:
Posts (Atom)